Denise Designed

Designing...Home, Career and You!!

  • Welcome
    • What’s New
  • Blog
    • Designing your Wall
    • DIY
    • Children’s Fashion
    • Food and Drink
    • Gardening
    • Outdoor Living
    • Favorite Posts
    • Guest Posts
  • Holidays
    • Thanksgiving
    • Halloween
    • Christmas
    • New Years Eve
    • Valentines
    • Easter
    • Memorial Day
  • Seasons
    • Fall
    • Winter
    • Spring
  • Home Tour
    • Home Tour Tuesdays
    • Holiday Home Tours
  • Series
    • 31 Days to Find My Way
    • Pregnant and Over 40
    • Toxoplasmosis
  • Blog Tips
    • Blog Directory
  • Advertise
    • Business Directory
    • Media Kit
  • Connect
    • Mobile App
    • Fave Links
    • Menu Item
  • Link Parties
    • Share it Sunday
    • Pinterest Profile
    • Home Tour Tuesdays
    • Blog Tips Link Party
    • Worthwhile Wednesdays
    • Grow Your G+ Circles
    • My Link-Ups
  • Services
    • Media Kit Program

Dresser Re-Dressed

By: denise designed

dresser header1

My closet is packed to the top.  I have started, slowly, organizing and cleaning out.  But I still have a lot of stuff!  I’ll post the closet transformation later since its still a work in progress.

In the meantime, again, because I still have a lot of stuff, I wanted to find a dresser that I could store some of that stuff.

Like always…I had a vision and couldn’t find what I wanted so I knew I had to make it!

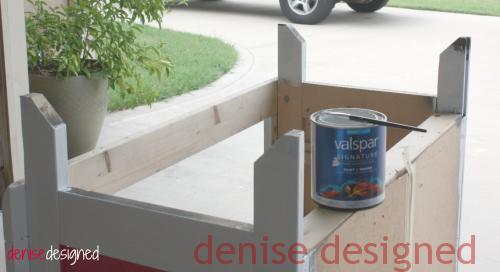
Lo and Behold…my neighbor was throwing one away that she had bought from IKEA and so of course I snapped it up.

dresser original

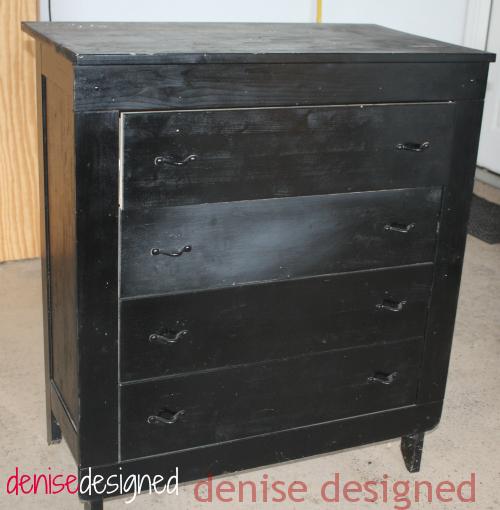
While it didn’t take me long to do, it sure was a lot of work.

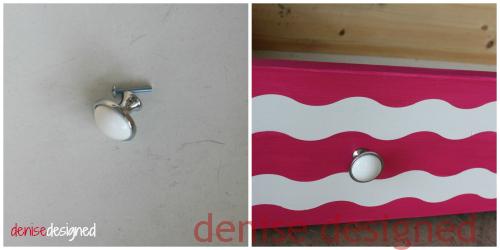
I first had to take off the hardware.

dresser hardware

Because my new hardware required only 1 hole, I had to fill the other hole with wood filler (with my fabulous helper…Emma).  Four drawers so 8 holes total.  Whew!

dress wood filler collage sig

Then I had to sand the dresser, which included sanding the holes with the wood filler.

dresser sanding

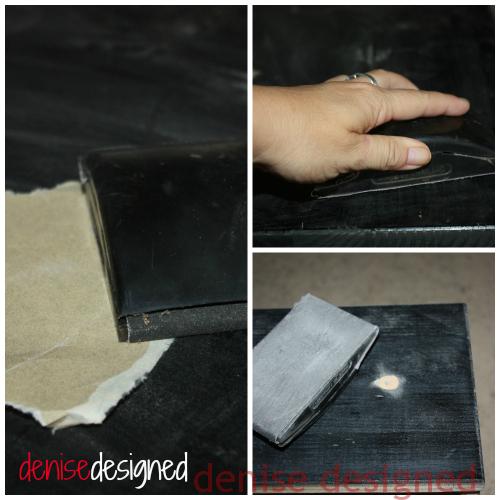
I KNOW…I KNOW…there are a lot of tutorials that show you how to paint a piece of furniture without sanding it, but this one was a mess.  I wasn’t trying to sand off the color, but trying to get a flat surface.  When you ran your hand over it, was like sandpaper.  But afterwards…smooth as a baby’s bottom.

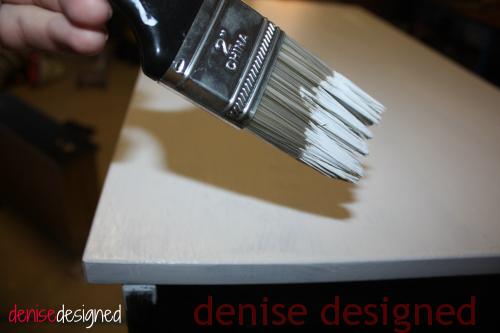
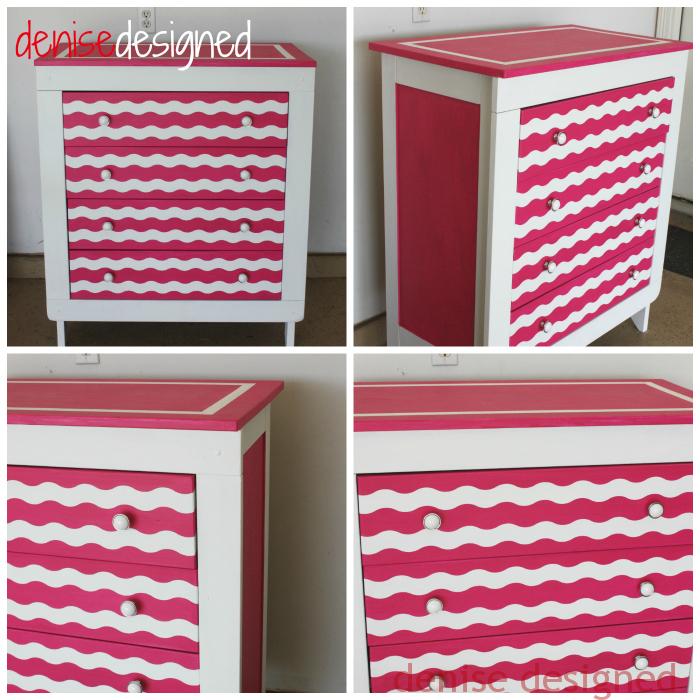
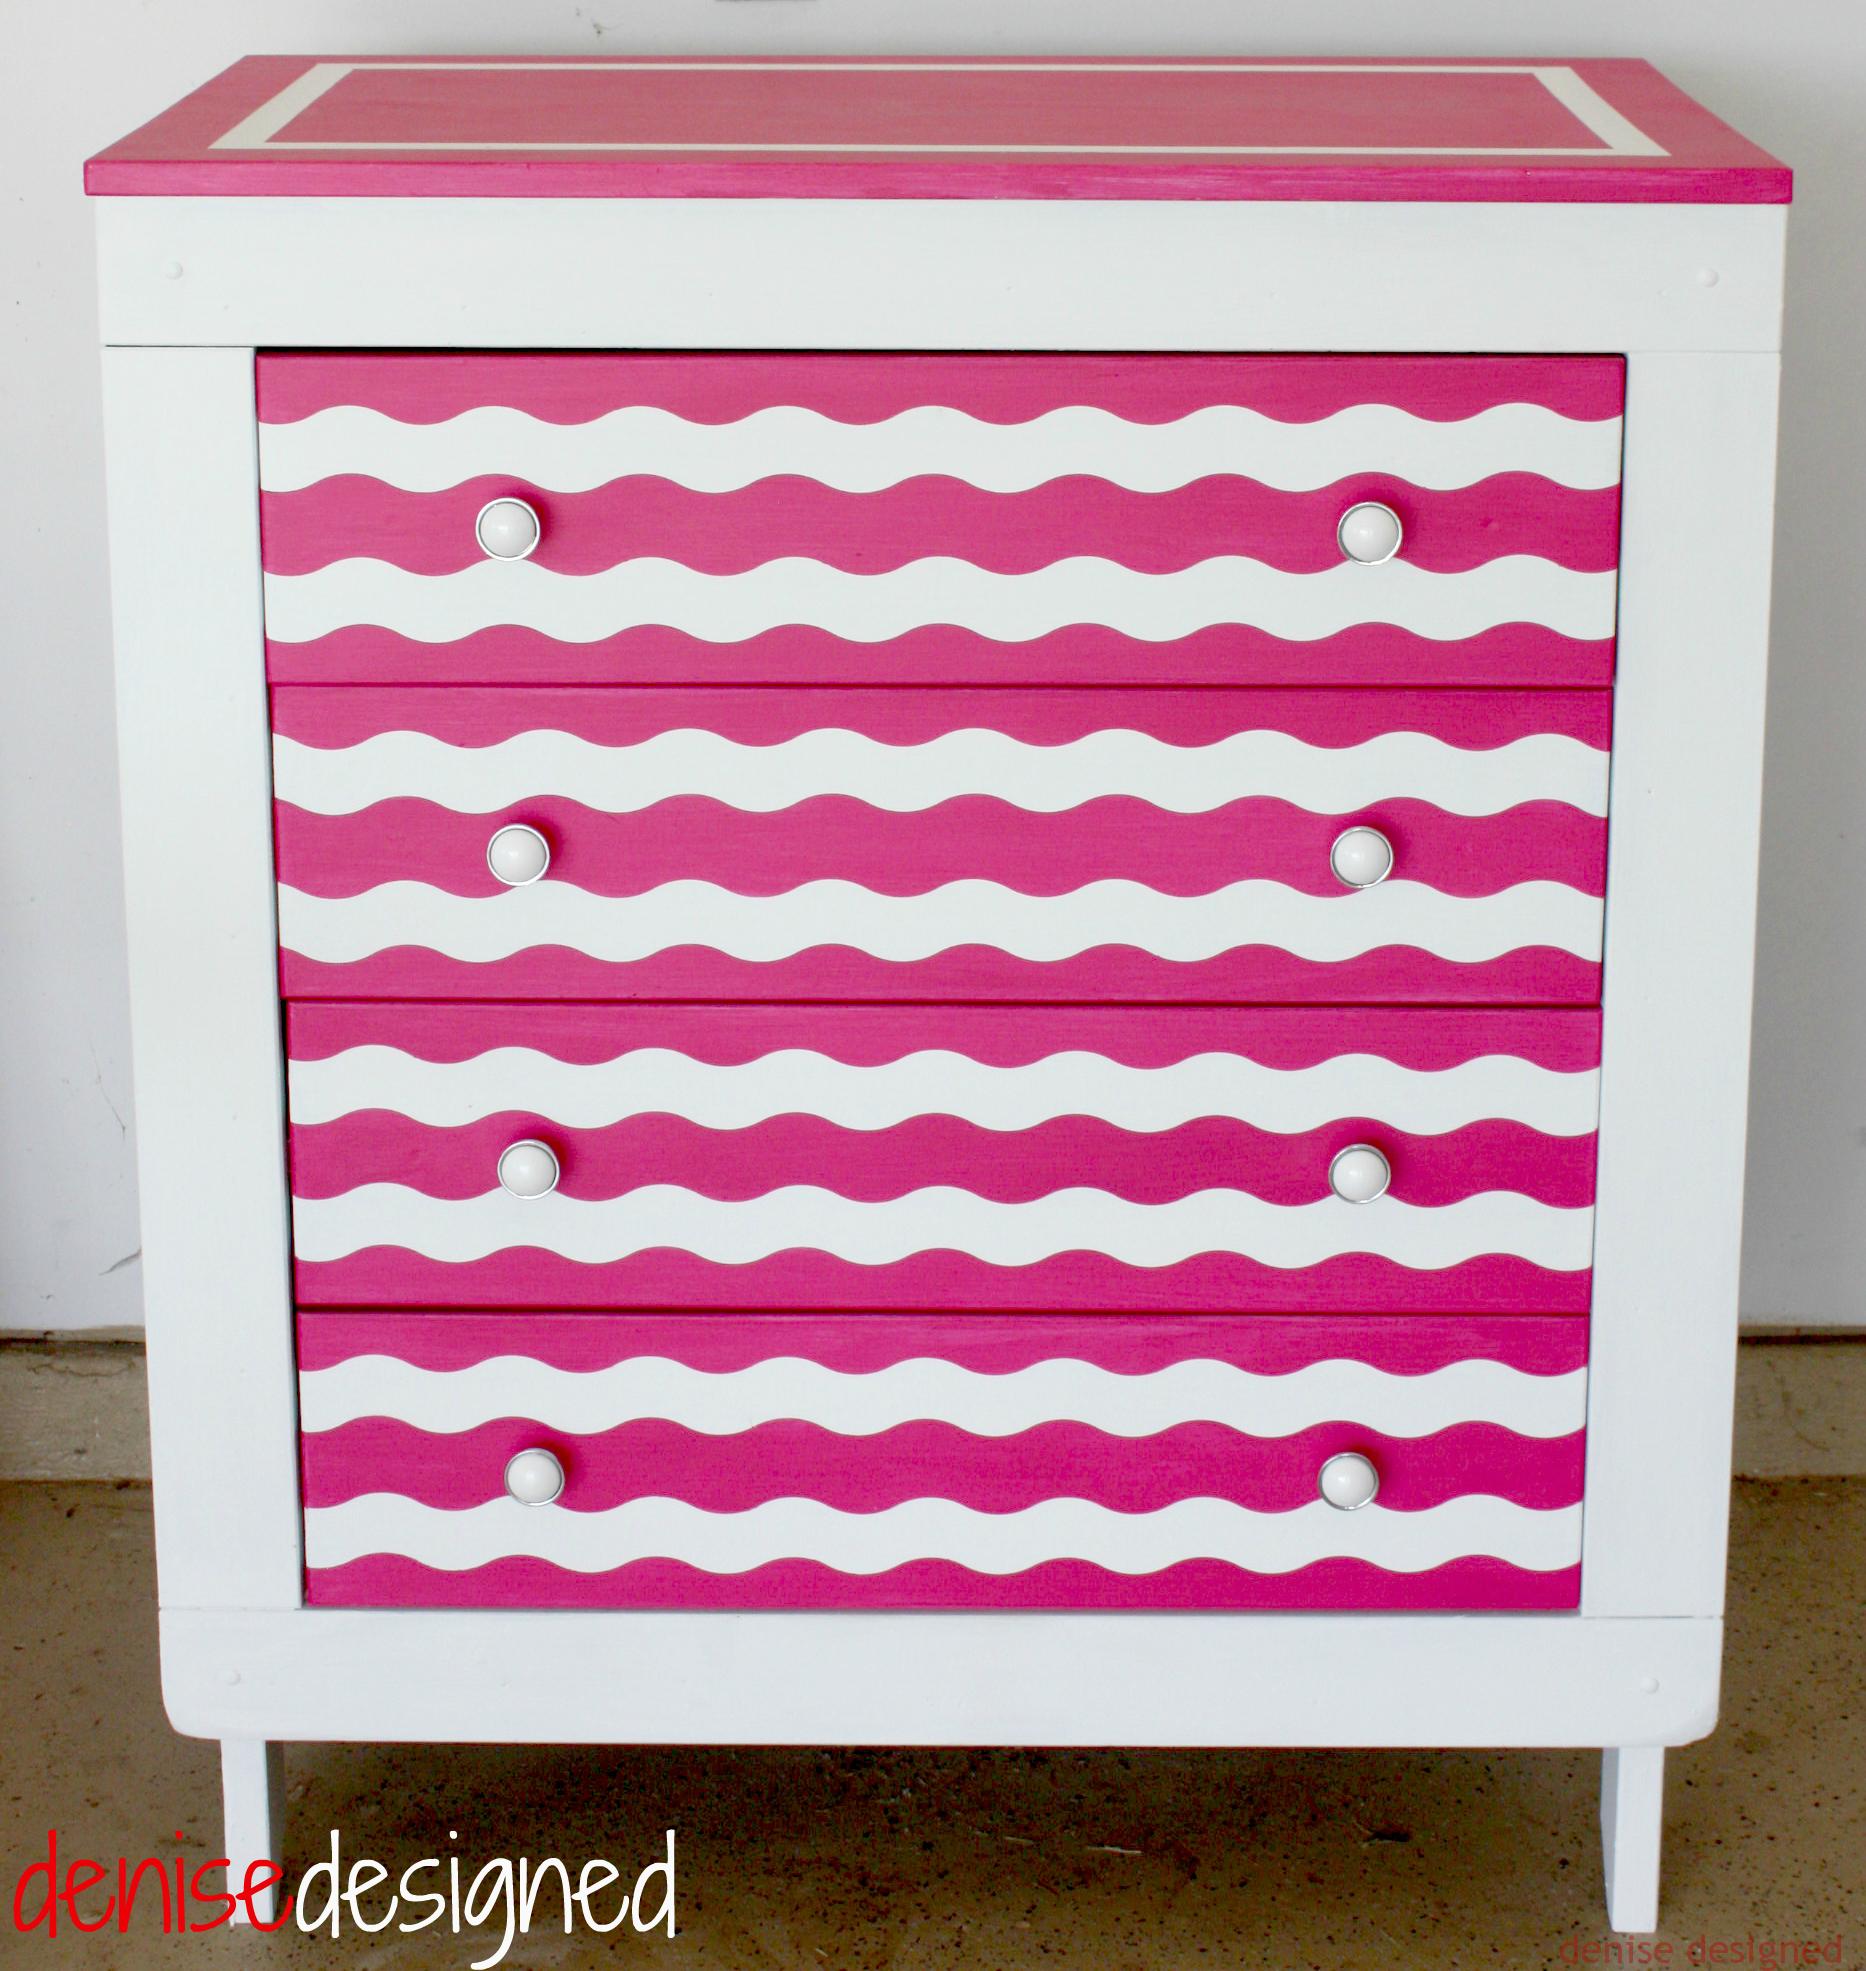
Once that was done, I started with a shade of cream and painted the whole piece, body and drawers.

dresser painting

Working with the drawers specifically…

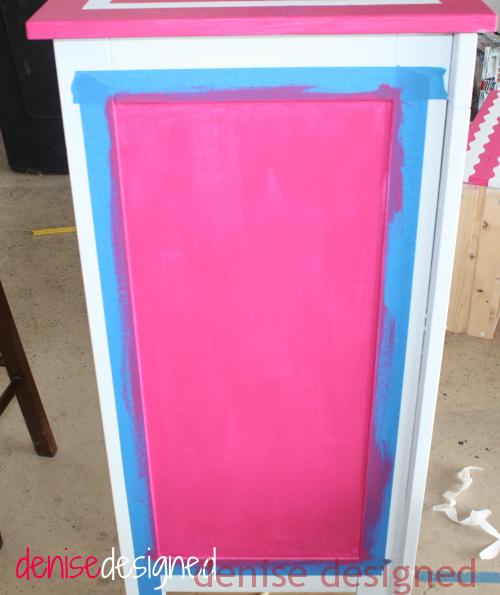
I finally had a chance to use the Wave FROGTAPE that I received from the Haven Conference as swag!  Yay!!

shapetape-wave

I taped out the design on each of the drawers and then painted with the fuschia color.

dresser drawer frog

Now it was time to work on the body of the dresser.  I reached for the Blue Tape and OH NO!!!  The Blue Tape had a mud dauber nest.

dresser mud dauber

GROSS!!

Of course I searched for something else right away and found masking tape.  I thought that the masking tape would work.  Boy was I wrong.  I had to go back and do a lot of touch up.  But regardless…I used the masking tape to tape the design on the top and then painted away!

dresser top collage

When I taped off the sides, I did use the Blue Tape.  I put my big girl panties on and cleaned off the mud dauber nest!  Again…GROSS!   And then I painted inside the tape as well.

dresser side blue tape

Once it was all dried and tape removed, I did have to flip it on its top and paint the legs.

dresser upside down

That was definitely hard to do right side up.  However, waiting for the legs to dry gave me the time to do some touch-up.  I won’t show you a picture of the effort there because I am a perfectionist and you would then see the imperfection too closely.  What I did learn, the more I tried to make it perfect, the more “not so perfect” it became.

I finally had to make myself just STOP and admire it for the piece that it was.

Last touch was to put the new hardware on the drawers.

dresser new hardware

Finished product!

dresser finished collage

While I DIY or pay someone else to DIY many things, furniture is usually not one of those items.  This was my first project and I think it was definitely a success.

dresser final

Stay tuned for the new jewelry station that I will DIY to hang behind this dresser.  Hopefully it will be sooner rather than later.  🙂

signature3

Related articles…

  • My first Have Conference (denisedesigned.com)
  • Blog Conference (denisedesigned.com)
  • other DIY (denisedesigned.com)

Author Signature

Share this:

  • Click to share on X (Opens in new window) X
  • Click to share on Facebook (Opens in new window) Facebook

Like this:

Like Loading...

Related

Comments

  1. OurRoseyLife says

    September 8, 2013 at 9:11 pm

    Denise, This is F-A-B-U-L-O-U-S!
    Michele

    • denisedesigned says

      September 9, 2013 at 5:14 pm

      Thank you Michele!! Was a lot of fun!!!

  2. Ashley ( says

    September 8, 2013 at 9:34 pm

    I didn’t realize that frog tape made different shapes. This dresser came out great, Denise! I love the color and design.

    • denisedesigned says

      September 16, 2013 at 7:13 pm

      Thanks Ashley!! You should check out the different shape tapes. I want to use the Chevron next!

  3. Jocelyn says

    September 8, 2013 at 10:43 pm

    This is so cute! I didn’t know about “shape tape” – that’s a great idea. Thanks for sharing!

    • denisedesigned says

      September 16, 2013 at 7:12 pm

      Oh Jocelyn…there are a couple of good Shape tapes to try…Chevron, the wave and like 2 more. Check them out…

  4. Marian says

    September 9, 2013 at 3:31 pm

    This is super cute Denise! You do good work lady!

    • denisedesigned says

      September 9, 2013 at 5:15 pm

      Thanks Marian! I appreciate you stopping by and giving your feedback! I think I might do some more soon! ha!

  5. joann says

    September 9, 2013 at 3:37 pm

    This looks great! well done.

    • denisedesigned says

      September 9, 2013 at 5:15 pm

      Thank you so much Joann!!

  6. kelley says

    September 10, 2013 at 7:08 am

    Looks fantastic!

    • denisedesigned says

      September 10, 2013 at 12:48 pm

      Thanks Kelley!

  7. Darla at HeartWork Organizing says

    September 10, 2013 at 2:28 pm

    Love! The pink is so great. The Frog Tape ShapeTape gives it interest. I used their chevron tape in a recent project, and a little birdie to help me out. Check it out here. http://heartworkorg.com/2013/09/10/fun-chevron-file-cabinet-with-annie-sloan-chalk-paint/

    • denisedesigned says

      September 10, 2013 at 8:26 pm

      Ha! Love it! Will check out the project. Thanks for stopping by and leaving a comment!!!

  8. Allie says

    September 10, 2013 at 3:19 pm

    That is fabulous! Make me want to do that to my daughter’s dresser!

    • denisedesigned says

      September 10, 2013 at 8:25 pm

      Yay for inspiration. You will have to share your pic when you have completed it!

  9. Rachel says

    September 12, 2013 at 2:51 pm

    The dresser was nice to begin with, but you certainly gave it the much needed update it deserved. I love the colors you chose! Perfect for storage! Thanks so much for sharing at Wednesday Whatsits!

    • denisedesigned says

      September 16, 2013 at 7:11 pm

      Thank you Rachel! Was a lot of fun to do. And thanks for hosting. Appreciate it!!

  10. Cathy says

    September 12, 2013 at 5:55 pm

    UMMMM THIS IS AMAZING!!!!!!!

    I’m inspired now–thank you!!
    ~Cathy

    • denisedesigned says

      September 16, 2013 at 7:10 pm

      Thank you so much Cathy!!! Yay!

  11. navywifeypeters says

    September 12, 2013 at 8:44 pm

    Great makeover! I love pink and white together! I’m pinning this!

    Navy Wifey Peters @ Submarine Sunday

    • denisedesigned says

      September 13, 2013 at 1:08 pm

      Yay! Thanks!

  12. glitterglueandpaint says

    September 13, 2013 at 1:54 pm

    Oh…do I ever love that shape tape! I had no idea. Your dresser is also amazing! Thanks for sharing this at Throwback Thursdays.

    xoxo
    Denyse

    • denisedesigned says

      September 16, 2013 at 7:09 pm

      Thanks Denyse! And I thank you for hosting! 🙂

  13. Rhonda says

    September 14, 2013 at 9:26 am

    I love it! You did such a nice job. Please think about coming to party at Craft Frenzy Friday at obsessiveandcreative.blogspot.com Your work would really add to our party!

    • denisedesigned says

      September 16, 2013 at 7:08 pm

      Will do! Thanks Rhonda. I will try to do that this week! Appreciate it!!! Thanks for stopping by and visiting your blog now.

  14. Kathy E. says

    September 15, 2013 at 9:46 am

    This is gorgeous! I am going to have to look for a dresser that would fit in my closet as I am tired of piles of clothes everywhere! Yours is so bright and cheery and just begs for clothes to jump in. Thanks for the inspiration and tute!

    • denisedesigned says

      September 16, 2013 at 7:07 pm

      I just put it in mine this weekend and I love it. I can’t wait to finish my transformation of adding color into my closet. I did do a big clean out though too over the past few weeks…rid of clothes and shoes. That helped some. Let me know how yours turns out…or what you even decide to do! Thanks for stopping by.

  15. nicole says

    September 15, 2013 at 6:25 pm

    Love it, the color is awesome!

    • denisedesigned says

      September 16, 2013 at 7:06 pm

      Thank you Nicole! And thank you for stopping by. I will have to share the closet where I put this, after I finish working on it. 🙂

  16. Suzy says

    September 19, 2013 at 5:35 am

    Hi Denise. I just love what you did with your Frog Tape. The dresser turned out great! You were featured at Home{work} Wednesday this week.

    • denisedesigned says

      September 19, 2013 at 7:01 am

      Thank you Suzy. Very exciting. Yay.

    • denisedesigned says

      September 19, 2013 at 8:11 am

      Btw…I did share out and will add the feature as a post as soon as I can. Thx again.

  17. Jen says

    October 23, 2013 at 10:21 pm

    Great job with this – I’m shocked that it was your first project! BTW I was at Haven too- I still need to try out the chevron tape I got in my swag bag. 😉 Thanks for sharing this at Throwback Thursday! (Pinning)

    • denisedesigned says

      October 25, 2013 at 6:24 am

      Definitely my first Furniture Project. Can’t wait then to see what you do with yours! Thank you for hosting the Link Party!

  18. Paula says

    October 26, 2013 at 3:45 pm

    I love this project and especially love the fun color combination that you chose. I also was at Haven and have yet to use my shape tape. Thanks for sharing with this week’s Throwback Thursday party.

Trackbacks

  1. Home{work} Wednesday #18 - Worthing Court says:
    September 17, 2013 at 7:00 pm

    […] Denise Redesigned […]

  2. Friday Flair Feature on Whipperberry.com says:
    September 23, 2013 at 4:45 pm

    […] Dresser Re-Dressed (denisedesigned.com) […]

  3. Home Tour Entryway says:
    October 16, 2013 at 1:02 am

    […] never thought myself to be a pink person.  But it has now grown on me.  If you saw my Re-Dressed Dresser post, you can see that I am even adding pink into my closet design!  Geesh the impact Emma has […]

  4. Hamper Makeover - says:
    November 23, 2013 at 9:56 am

    […] if you recall, I Re-Dressed my Dresser and placed that dresser in the spot where the hamper was […]

  5. Throwback Thursday #14 - Sweet Pea says:
    December 11, 2013 at 7:01 pm

    […] Dresser Re-Dressed by Denise Designed […]

  6. Throwback Thursday #14 - Girl in the Garage says:
    December 11, 2013 at 7:04 pm

    […] Dresser Re-Dressed by Denise Designed […]

  7. Throwback Thursday #13 - Glitter Glue & Paint says:
    December 11, 2013 at 7:23 pm

    […] Dresser Re-Dressed by Denise Designed […]

  8. Throwback Thursday & Voodoo Pecans - An Alli Event says:
    December 13, 2013 at 4:05 am

    […] Dresser Re-Dressed by Denise Designed […]

  9. Throwback Thursday Linky Party - Restoration Redoux says:
    December 26, 2013 at 8:02 am

    […] Dresser Re-Dressed by Denise Designed […]

Thanks for stopping by Denise Designed today where you will find Home Design Inspiration and DIY Tutorials along with many things Lifestyle and Business related. My goal is to Inspire while being Inspired myself! So stick around, peruse the site, pin your favorite posts and check back regularly for new Inspiration. Or heck!! Go crazy wild and sign up for daily or weekly updates in your inbox. Regardless of whether you are the casual visitor or a loyal reader, hope you find a little something in which I have helped to Design...Home, Career and You!!! Read More…

Follow Me on Pinterest Visit Denise Designed's profile on Pinterest.

Categories

Share it Sunday Link Party

Top Posts & Pages

Fun DIY Inspiration at Sunday Features {223}
Spring Forward at Sunday Features {219}
Come on Spring at Sunday Features {218}
Makeovers and Healthy Choices at Sunday Features {216}
Spring into Spring at Sunday Features {215}
Heart Day is Around the Corner at Sunday Features {214}
Rivit Media Publisher

Download My Button

DeniseDesigned
<a href="DeniseDesigned" target="_blank"><img src="https://denisedesigned.com/wp-content/uploads/2014/01/dd-ad-200.jpg" alt="DeniseDesigned" width="125" height="125" /></a>
I'm posting away onHometalk.com
Topics I Follow:, Remodeling, Bedroom, Tools, Gardening

Archives

Categories

30 Days of Gratitude 31 Days to Find My Way All Editorials Blog Blogging Blog Tips Burlap Christmas Christmas Design crafty hangouts Designing your Wall DIY Editorials Events Fall Decor Fashion Favorite Posts Features Food and Drink Gardening Giveaways Google Hangout Gratitude Health and Beauty Holidays Home Home Design Home Tour Interviews Life Link Party Organization Outdoor Living Photo Tip of the Week Pinterest Party Recipes Round ups Seasons Share it Sunday Spring Sunday Features Videos Virtual Launch Party Who's Who Here Worthwhile Wednesdays

Copyright © 2025 · Modern Blogger Pro Theme By, Pretty Darn Cute Design


Loading Comments...
 

    %d