Denise Designed

Designing...Home, Career and You!!

  • Welcome
    • What’s New
  • Blog
    • Designing your Wall
    • DIY
    • Children’s Fashion
    • Food and Drink
    • Gardening
    • Outdoor Living
    • Favorite Posts
    • Guest Posts
  • Holidays
    • Thanksgiving
    • Halloween
    • Christmas
    • New Years Eve
    • Valentines
    • Easter
    • Memorial Day
  • Seasons
    • Fall
    • Winter
    • Spring
  • Home Tour
    • Home Tour Tuesdays
    • Holiday Home Tours
  • Series
    • 31 Days to Find My Way
    • Pregnant and Over 40
    • Toxoplasmosis
  • Blog Tips
    • Blog Directory
  • Advertise
    • Business Directory
    • Media Kit
  • Connect
    • Mobile App
    • Fave Links
    • Menu Item
  • Link Parties
    • Share it Sunday
    • Pinterest Profile
    • Home Tour Tuesdays
    • Blog Tips Link Party
    • Worthwhile Wednesdays
    • Grow Your G+ Circles
    • My Link-Ups
  • Services
    • Media Kit Program

Burlap Wreath Tutorial

By: denise designed

burlap wreath tutorial

This is the easiest DIY Burlap Wreath ever!!

So I wanted to provide you a tutorial to do your own.  You still have enough time.  And I am sure you have an empty space to hang or lay another wreath.  Or what about the one person you haven’t figured out what to buy yet?

This is perfect and doesn’t take much time at all.

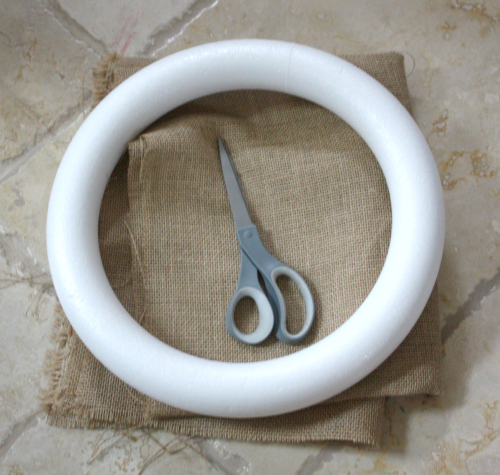
All you need is:

  • 14″ Foam Wreath – you can use any size, but this is the most common to size to hang
  • 36×36 Burlap Fabric
  • Scissors

burlap wreath supplies

First cut your strips of fabric.

burlap wreath strips

Above I mentioned that you needed a 36×36 piece of burlap.  However, if you can’t find 36×36, you can manage.  Just figure that you need about 60 18″ strips of burlap with a 1″ width.  And your strips can be shorter or longer than 18″.  I just happened to cut mine that length and while it looks great, yours will as well.  I would just be cautious of cutting too short.

Next you will want to tie your strips, double knotted, to the foam wreath.

burlap wreath tie

Continue to do that until you have used all of the strips.

burlap wreath backside

Once you are finished, you will then want to cut the strings…where the burlap begins to unravel.

burlap wreath cleanup

But because there will be plenty, flip it over so that you are looking at the backside, and start there first.  Once you are done, the busy-ness of the front side won’t overwhelm you so much!

And there you have it!  A completed Burlap Wreath that you created yourself.

burlap wreath final

For some reason, Burlap seems to be very popular and I have used it in both my Fall and now my Christmas Design.  This week I will highlight Burlap in a round-up of how and where I have used and include some other bloggers as well.  Stay tuned.

Be sure to subscribe to keep up with all that’s happening here at DENISE DESIGNED.

AND…

For more inspiration, stop by Share it Sunday to Inspire and Be Inspired.

Share it Sunday Feature 500

Link up your Favorite Posts/Projects or Peruse others.  Party launches on Saturday nights and runs through Thursday nights!

But WAIT!!!

Need some last minute Homemade Gift Ideas…check out these from Angie at Country Chic Cottage.  She even included my Crafty Hangouts Redneck Glasses Video Tutorial.  If you want a good laugh…check that out!

handmadegifts

And Lastly…I am participating in a Everything Christmas Tour with 14 other Bloggers.  Check out the Post and Link up your Favorite Pinterest Pin(s) below!

everything christmas tour 500

A lot going on!  Hope you enjoy and look forward to some great posts this week!

Author Signature

Share this:

  • Click to share on X (Opens in new window) X
  • Click to share on Facebook (Opens in new window) Facebook

Like this:

Like Loading...

Related

Thanks for stopping by Denise Designed today where you will find Home Design Inspiration and DIY Tutorials along with many things Lifestyle and Business related. My goal is to Inspire while being Inspired myself! So stick around, peruse the site, pin your favorite posts and check back regularly for new Inspiration. Or heck!! Go crazy wild and sign up for daily or weekly updates in your inbox. Regardless of whether you are the casual visitor or a loyal reader, hope you find a little something in which I have helped to Design...Home, Career and You!!! Read More…

Follow Me on Pinterest Visit Denise Designed's profile on Pinterest.

Categories

Share it Sunday Link Party

Top Posts & Pages

Fun DIY Inspiration at Sunday Features {223}
Spring Forward at Sunday Features {219}
Come on Spring at Sunday Features {218}
Makeovers and Healthy Choices at Sunday Features {216}
Spring into Spring at Sunday Features {215}
Heart Day is Around the Corner at Sunday Features {214}
Rivit Media Publisher

Download My Button

DeniseDesigned
<a href="DeniseDesigned" target="_blank"><img src="https://denisedesigned.com/wp-content/uploads/2014/01/dd-ad-200.jpg" alt="DeniseDesigned" width="125" height="125" /></a>
I'm posting away onHometalk.com
Topics I Follow:, Remodeling, Bedroom, Tools, Gardening

Archives

Categories

30 Days of Gratitude 31 Days to Find My Way All Editorials Blog Blogging Blog Tips Burlap Christmas Christmas Design crafty hangouts Designing your Wall DIY Editorials Events Fall Decor Fashion Favorite Posts Features Food and Drink Gardening Giveaways Google Hangout Gratitude Health and Beauty Holidays Home Home Design Home Tour Interviews Life Link Party Organization Outdoor Living Photo Tip of the Week Pinterest Party Recipes Round ups Seasons Share it Sunday Spring Sunday Features Videos Virtual Launch Party Who's Who Here Worthwhile Wednesdays

Copyright © 2025 · Modern Blogger Pro Theme By, Pretty Darn Cute Design


Loading Comments...
 

    %d