Denise Designed

Designing...Home, Career and You!!

  • Welcome
    • What’s New
  • Blog
    • Designing your Wall
    • DIY
    • Children’s Fashion
    • Food and Drink
    • Gardening
    • Outdoor Living
    • Favorite Posts
    • Guest Posts
  • Holidays
    • Thanksgiving
    • Halloween
    • Christmas
    • New Years Eve
    • Valentines
    • Easter
    • Memorial Day
  • Seasons
    • Fall
    • Winter
    • Spring
  • Home Tour
    • Home Tour Tuesdays
    • Holiday Home Tours
  • Series
    • 31 Days to Find My Way
    • Pregnant and Over 40
    • Toxoplasmosis
  • Blog Tips
    • Blog Directory
  • Advertise
    • Business Directory
    • Media Kit
  • Connect
    • Mobile App
    • Fave Links
    • Menu Item
  • Link Parties
    • Share it Sunday
    • Pinterest Profile
    • Home Tour Tuesdays
    • Blog Tips Link Party
    • Worthwhile Wednesdays
    • Grow Your G+ Circles
    • My Link-Ups
  • Services
    • Media Kit Program

DIY A Wall Vanity

By: denise designed

Don’t have a vanity table or can’t seem to find the right one?  You can make one yourself.

So today I am going to show you how to…

DIY A Wall Vanity

Floating Vanity Table

It will take you a couple of days as you will be using both stain and polyurethane.  But the project itself is fairly easy!

You will need the following supplies:

  • Shelf (you can either cut yourself or buy at Home Improvement Store…mine is from Home Improvement)
  • Corbels
  • Stain
  • Polyurethane
  • Sponges (one for stain and one for poly)
  • Rag
  • Plastic (to stain on)

Floating Wall Vanity Supplies

You will also need both a mirror (see below) and some stools or a bench.  I chose 2 storage stools.

Storage Stools (for Floating Wall Vanity)

First you should check to see if you need to sand the wood at all.

Then you will want to stain the shelf.

Staining the Floating Wall Vanity

Corbels will need to be stained as well.

Staining the Corbels for the Floating Wall Vanity

They will need to dry for at least 4 hours, stain reapplied and then let dry for another 4 hours.

Once dried, add the polyurethane to both the shelf and the corbels.

Polyurethane on the Floating Wall Vanity

The Polyurethane will need to dry for about 8 hours.  You may want to apply a second coat. And you may want to sand thereafter with the finest sandpaper you can buy.  You will have to just use your gut, fingers and eyes to determine.

I added 2 coats of poly to them.

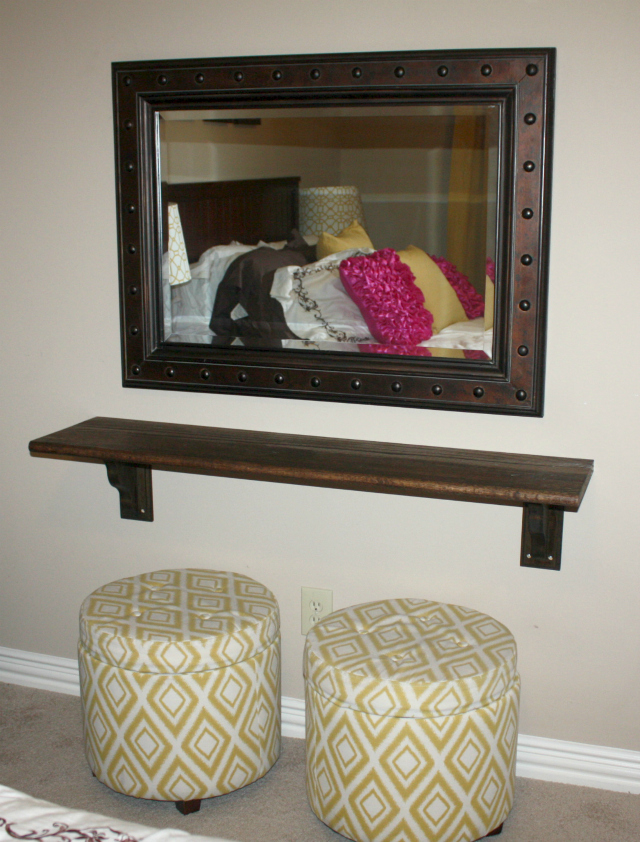
And then it is time to hang the shelf, the mirror and place the stools.

Final Floating Wall Vanity in Guest Room

Love the way this turned out in my guest room!!  Hope that I have given you some inspiration.

DIY a Floating Wall Vanity.  This was made for my guest room!

Have you stopped by Share it Sunday yet?  Either search the links for Inspiration or link up your favorite project to Inspire others!!

Share it Sunday Feature 500

Stay tuned tomorrow for a fabulous Spring Link Party with 35 blogs participating.  That’s 35 Different Blogs in which your Links will be shared!!!

scoop link party

Author Signature

Share this:

  • Click to share on X (Opens in new window) X
  • Click to share on Facebook (Opens in new window) Facebook

Like this:

Like Loading...

Related

Comments

  1. Melissa Valmonte says

    March 6, 2014 at 5:21 am

    This is fantastic! I want to do this for my room! It’s also a great space saver especially for apartment living!

  2. Erlene says

    March 9, 2014 at 6:16 pm

    Hi. New to your blog and started following you on some of your social sites. Found your blog through the linky party.

Thanks for stopping by Denise Designed today where you will find Home Design Inspiration and DIY Tutorials along with many things Lifestyle and Business related. My goal is to Inspire while being Inspired myself! So stick around, peruse the site, pin your favorite posts and check back regularly for new Inspiration. Or heck!! Go crazy wild and sign up for daily or weekly updates in your inbox. Regardless of whether you are the casual visitor or a loyal reader, hope you find a little something in which I have helped to Design...Home, Career and You!!! Read More…

Follow Me on Pinterest Visit Denise Designed's profile on Pinterest.

Categories

Share it Sunday Link Party

Top Posts & Pages

Fun DIY Inspiration at Sunday Features {223}
Spring Forward at Sunday Features {219}
Come on Spring at Sunday Features {218}
Makeovers and Healthy Choices at Sunday Features {216}
Spring into Spring at Sunday Features {215}
Heart Day is Around the Corner at Sunday Features {214}
Rivit Media Publisher

Download My Button

DeniseDesigned
<a href="DeniseDesigned" target="_blank"><img src="https://denisedesigned.com/wp-content/uploads/2014/01/dd-ad-200.jpg" alt="DeniseDesigned" width="125" height="125" /></a>
I'm posting away onHometalk.com
Topics I Follow:, Remodeling, Bedroom, Tools, Gardening

Archives

Categories

30 Days of Gratitude 31 Days to Find My Way All Editorials Blog Blogging Blog Tips Burlap Christmas Christmas Design crafty hangouts Designing your Wall DIY Editorials Events Fall Decor Fashion Favorite Posts Features Food and Drink Gardening Giveaways Google Hangout Gratitude Health and Beauty Holidays Home Home Design Home Tour Interviews Life Link Party Organization Outdoor Living Photo Tip of the Week Pinterest Party Recipes Round ups Seasons Share it Sunday Spring Sunday Features Videos Virtual Launch Party Who's Who Here Worthwhile Wednesdays

Copyright © 2025 · Modern Blogger Pro Theme By, Pretty Darn Cute Design


Loading Comments...
 

    %d